Showing posts with label dairy free. Show all posts

Monday, 23 December 2013

Flour less fruit and nut cake


This time last year, I was on a strict elimination diet which meant I could not eat gluten, dairy, eggs, soy, nuts etc. However, even though I am back to a normal diet now, a few habits I developed during the elimination diet have stayed with me and I often make gluten free cakes. Plus, I also wanted to create a festive recipe that people with food intolerances could also enjoy. The result is my flour less fruit and nut cake. It is #gluten free and #dairy free, uses minimal sugar and can easily be converted into a #vegan version. And as far as fruit and nut cakes go, this one is pretty extravagant, which is fitting for this time of the year.

Ingredients:

Fruit mix
1 cup of mixed dried fruit (I used sultans, currants, cranberries, figs, prunes and dates)
Zest and juice of 1 orange
1 heaped teaspoon of ground ginger
1 heaped teaspoon of ground cinnamon
1/4 cup of cognac (brandy, sherry or rum can also be used, alternatively replace with orange juice for an alcohol free version)

Nut mix
1 cup of  chopped nuts (I used almonds, macadamias, hazelnuts, walnuts, pecans and pistachios)

Cake batter
1 cup of almond meal
2 eggs (or two heaped teaspoons of egg replacer powder mixed in water for a vegan version)
Zest and juice of 1 orange
1/4 cup of soft brown sugar
2 tablespoons of rice bran oil (or any other light cooking oil)
1 teaspoon of baking powder

Glaze and topping
3 heaped tablespoons of apricot jam
1 tablespoon of water
Handful of nuts and cranberries to decorate

Method

I prefer to make the fruit mixture in advance so that the spices and alcohol can infuse into the fruit. Simply place all the ingredients (dried, fruit, spices, cognac, zest and juice) together in a mixing bowl and mix well to combine. Cover with cling wrap and set aside for at least 20 minutes or overnight of time permits.

To make the cake batter combine the almond meal, brown sugar and baking powder and mix well with a spatula to ensure there are no lumps. Add the chopped nuts and mix. In a separate mixing bowl, lightly beat two eggs, add the oil and juice and zest of an orange followed by the dry fruit mixture. Add the wet ingredients to the dry and mix to combine. Pour the cake batter into a lined loaf or small cake tin. Bake in a 180 C fan forced oven for 55-60 minutes.

Remove from in the oven, cool in the tin for 15 minutes and then remove from tin and cool on a wire rack.

To make the glaze, place the apricot jam and water in a small saucepan and heat over a low flame for 2-3 minutes or until tiny bubbles appear around the edges. Brush on the warm glaze on to the cool cake. Decorate with nuts and dried fruit of your choice and place some of the remaining glaze on to the nuts and fruit to give them a beautiful sheen.

The cake is delicious on its own, but any left over cake can be served with custard or ice cream.

I hope you enjoy this moist and rich cake with your family and friends or give it as a beautiful edible christmas present. You do not have to be on a gluten free diet to enjoy this lovely cake, but if by any chance you have someone with a food intolerance in your circle of family and friends, they will feel completely spoilt when you make this for them.


Monday, 16 December 2013

Mince pie - Gluten free and vegan


This pie is #gluten free, #dairy free, # nut free, # vegetarian, #vegan.

The pastry is made with amaranth flour, which is gluten free and a healthier substitute to flour and results in a crispy yet chewy pastry. To make one large pie or 12 small ones you will need:

1 cup of amaranth flour
1/4 cup of pure icing sugar (sifted)
1/4 cup of rice bran oil
2 tablespoons of cold water


I make a large batch of the fruit mince mixture and use it for regular as well as gluten free pies. The fruit mix quantity mentioned catered for 1 dozen small, 1 dozen medium and 1 large pie.  Depending on the number of pies you make, you may have some extra mixture left over, which can be refrigerated for use later.

Fruit mix

1 cup of chopped sultanas
1 cup of currants
1/2 cup of chopped cranberries
Zest and juice of 1 orange
2 tablespoons of brandy
1 heaped teaspoon of ground cinnamon
1 heaped teaspoon of ground ginger
1/4 cup of maple syrup or honey

For the dry fruit mixture, mix all the ingredients together and allow to stand for a minimum of 20 minutes or overnight if time permits.

Make the pastry by mixing the flour, sugar and oil. Use the cold water to bring the dough together. Because there is no gluten the dough does not need to be worked, you just need to ensure the ingredients are mixed through and come together. Wrap in cling wrap and chill for 20 minutes. Roll out the pastry between two sheets of grease proof paper. The pastry is very fragile, so it is easier to make smaller pies, alternatively, do what I do and place the pastry in the pie tin and spread it with your fingers, just like you would for the base of a cheese cake, taking care that the sides are pushed all the way up to give the pie crispy edges.  Reserve some pastry for the pie tops. The pastry scraps can be brought together and rolled out. This pastry does not need to be blind baked as the sugar and oil ensure you get a crispy pastry, so you can add the fruit mince mixture, place the pastry tops and bake in a 180 C oven for 30-40 minutes. I have opted to put little star cutouts, but you can add strips of pastry to make a lattice, add slivered almonds or leave it open just as with a tart, though take care not to burn the fruit.

Dust with icing sugar and enjoy warm or cold.


Monday, 9 December 2013

Palak wali dal - lentils with spinach


Given that I have an absolute abundance of spinach in my garden right now, I have been using it in absolutely everything from quiches, pies, curries, soups, sauteed with eggs and now with dal. I remember my mum used to make something similar and I have tried to recreate the dish from memory. I have used split Urad dal but I am sure other lentils will also work. You can eat it Indian style with flat bread or rice or enjoy it like a thick, chunky soup with some crusty bread.

Ingredients:

2 Cups of Urad dal (rinsed and soaked for at least 20 minutes)
4 cloves of garlic
1 inch piece of ginger
1 large onion chopped finely
1 tomato finely chopped
1 large bunch of spinach -  washed and roughly chopped
Salt and chilli powder to taste
1/4 teaspoon of turmeric powder
1/2 teaspoon of Garam masala powder
2 tablespoons of cooking oil (I use rice bran oil)
Coriander springs for garnish

Method:

I precook the dal and cook the spinach with tarka  (tempering) to avoid overcooking the spinach. I pressure cook the dal but you can also cook it in a saucepan until tender.

Cook the washed and soaked dal in about six cups of water with the chopped onion, garlic and turmeric powder until tender.  A pressure cooker will speed up the cooking time. Allow the pressure cooker to come to pressure on high flame, then turn down the gas and allow it to come to pressure two more times. Turn off the gas, set aside and allow the pressure to dissipate on its own.

Fot the tarka, heat up a skillet and add the the cooking oil. Add the chopped onions and fry on a medium heat until the onions are golden brown in colour. Add the chopped tomato and cook for a further 5 minutes. Add the salt and chilli powder followed by the chopped spinach. Cook on a low heat until the spinach wilts and is tender. Add the garam masala powder and add the tarka (the spinach, onion tomato mixture) to the cooked dal or add the cooked dal to the tarka (depending on the size of your utensils, the idea is to combine the two). Bring the dal to a boil (adding more water if required to achieve the desired consistency), add the chopped coriander. Serve hot and enjoy.


Monday, 2 December 2013

Chicken and potato curry


This dish is inspired by meat curries made in Bengal, where potatoes are often added to chicken or mutton curries. The potatoes not only bulk up the meal, which makes it go further but also absorb all the flavours while cooking and as a result taste delicious. I have also cooked this dish in mustard oil, which is also commonly used in Bengal and it provides another dimension to the dish, but vegetable or olive oil can also be used if preferred.

I have used boneless thigh fillets, but a whole chicken or skinless drumsticks can also be used, though the cooking time will vary.

Ingredients
500 gms chicken thigh fillets, cubed
6 medium sized potatoes cut in 8 pieces
2 large onions minced
1 tomato pureed
1 inch piece of ginger minced
6 cloves of garlic minced
Salt and chilli powder to taste
1/2 teaspoon of turmeric powder
2 dried red chillies
1/4 teaspoon fenugreek seeds
1 teaspoon curry powder
1/4 cup chopped corriander
2 tablespoons of mustard oil
1 cup water

In a large wok or skillet, heat the mustard oil and add the dried chillies and fenugreek seeds. Wait about 30 seconds before adding the minced onion, ginger and garlic ( I mince them together in a food processor, and in the past would have added at least 2 green chillies as well but since I am cooking toddler friendly meals, I have cut down on the chilli quotient). Brown the onion mixture ( get this step right and all your curries will taste delicious, so take the time, stir frequently and allow the onions to caramelise) before adding the pureed tomato. Add the salt, chilli powder and turmeric and mix well. Then add the cubed chicken pieces and stir to ensure the chicken pieces are well coated. Next add the cubed potatoes and mix well. Add the curry powder mixed in one cup of water. Bring the curry to a boil, then cover and simmer for 20 minutes,  giving it a stir now and then to ensure the bottom does not catch. You may add extra water to achieve the preferred consistency. Add the chopped corriander and serve warm with plain rice or chappati and a simple salad.

Enjoy!


Monday, 30 September 2013

Easy chicken curry


This recipe is my stock standard chicken curry recipe. It is quick and easy to make, has no cream, nuts or dairy and is both healthy and yummy. A favourite for the entire family.

You will need:

500 gm free range chicken thigh fillet (chopped into medium sized cubes)
2 onions
6 cloves of garlic
2 cm piece of ginger
2 tablespoons of tomato paste
Salt to taste
1/2 teaspoon of red chilli powder (or to taste)
1/2 teaspoon of garam masala or shop bought chicken curry masala
1/4 teaspoon of turmeric powder
1 tablespoon of kasoorie methi (dried fenugreek leaves)
2 tablespoons of oil
1 bay leaf
2 cm piece of cinnamon bark
2 cloves
1 black cardamon

Method

Peel the onion, garlic and ginger and puree them in a food processor (these days I am cooking my meals toddler friendly, so there are no green chillies here but you can add 1-2 green chillies as they add to flavour and of course some heat as well) . In a wok or heavy based skillet, add the oil and the whole spices and cook for 30-40 seconds before adding the onion mixture. Cook, stirring regularly until the mixture has reduced and browned. Add the tomato paste, followed by the dried fenugreek leaves and all the powdered spices. Cook for 2 minutes and then add the chicken pieces. Ensure all the chicken is coated with the onion tomato mixture and stir often to ensure all the chicken pieces are sealed. Now add some plain water (depending on the consistency you are after and whether you are serving the curry with bread or rice) keeping in mind that the chicken will also release some water during the cooking process. I always add less, and then add more later if needed, much easier than fixing a thin, watery curry (though there are a few tricks to do that as well, I will post them some other time). Bring the curry to a boil, reduce the heat, cover and simmer for 15-20 minutes or until the chicken is tender.

Garnish with boiled eggs or fresh coriander springs. Serve hot with rice or flat bread, and if you have any left over, you are in luck as this curry tastes even better the following day.


Saturday, 27 April 2013

Raspberry surprise chocolate cupcakes


These scrumptious cupcakes are both gluten free and vegan. To make a batch of 12 you will need the following:

1 cup almond meal
1 cup chick pea flour (besan)
1 cup soft brown sugar
1/4 of pure cacao powder
1/4 cup of oil
3/4 cup almond milk
1.5 teaspoons of baking powder
1/2 teaspoon baking soda
Pinch of salt
2 heaped teaspoons of egg replacer powder
1 teaspoon of vanilla extract


Raspberry compote*
1 cup of fresh or frozen raspberries
2 tablespoons of soft brown sugar
 * alternatively you can use a good quality shop bought raspberry conserve or jam

Chocolate icing
1 avocado
1 teaspoon of cacao powder
1.5 teaspoon of icing sugar


I always start with making the raspberry compote as I like it to be cool when I add it to the cup cake mixture. Place the raspberries in a saucepan and turn on the heat, cook the raspberries until they have softened and the juices have released and started to evaporate. Add the sugar; I like the mixture to be a little tart as it contrasts well with the chocolate cake, but if you prefer you can increase the quantity of sugar added. Cook until the mixture is glossy and has a jam like consistency. Set aside to cool.

Pre heat a fan forced oven to 180C and line a cupcake tin with paper cases. In a large mixing bowl add all the dry ingredients and mix well with a spatula, taking care to break any lumps in the almond meal or brown sugar. In a separate bowl mix the almond milk, oil and vanilla extract and add to the dry ingredients. Mix to form a smooth batter, taking care not to over mix.

Fill the lined cup cake tin with the cake mixture, placing enough mixture to fill each mould half way. Add one teaspoon of the raspberry compote and then top with the remaining mixture until the cup cake moulds are 3/4 full. Place in the oven and cook for 20 minutes.

Remove from the oven and place on a wire rack to cool. Once cooled you can either dust with cacao powder or icing sugar.

As a special treat, I often ice the cakes with a vegan icing. In the past I would have used vegan margarine, but now I use avocado instead which is so much healthier. However, you need to be careful to only ice the number of cakes you actually need as avocado tends to oxidise, not that you would notice with the cacao powder in it:)

To make the icing, finely mash one avocado (to frost about 4 cupcakes), so that there are no lumps and add the cacao powder and icing sugar and mix well.  Place the mixture in  a piping bag and pipe onto the cupcakes or use a palette knife to spread. Top with a fresh raspberry. Serve and enjoy.


Eggplant fritters (pakoras)


These fritters are the perfect snack for a lazy afternoon, especially if it is raining outside. They are even better served with a cup of hot chai.

You will need:

1 small-medium sized eggplant
1 cup chickpea flour
1/4 teaspoon ajwain  (bishops weed)
1/2 teaspoon of salt
1/4 teaspoon of chilli powder
2 small cloves of garlic grated
1/2 teaspoon of dried kasoorie methi (fenugreek leaves)
A pinch of baking powder
Approximately 3/4 cup of water
Oil to fry

Slice the eggplant into thin slices and season with salt and set aside. Make the batter by placing the chickpea flour in a large mixing bowl. Add the ajwain and  fenugreek leaves if using. They are not necessary but add to the flavour. You can add chopped coriander and green chilli instead if you prefer or keep it plain. Add the powdered spices and baking soda and mix. Gradually add the water to get a thick batter. You will need between 1/2 to 3/4 cup.

The pakoras are traditionally deep fried, but I use a non stick pan and panfry them.  Heat a non stick pan and add enough oil to cover the bottom in a thin layer. I use rice bran oil because of the high smoke point. Once the oil is hot but not smoking, dip the eggplant slices in the batter and place in the fry pan (being careful to place away from you). Do not overcrowd the frying pan. Cook both sides until golden brown and crispy. Serve hot with tamarind chutney.

Sunday, 21 April 2013

Gluten free, vegan, walnut brownies


These brownies are so decadent that you won't even realise that there is no gluten, eggs or dairy in them.

Ingredients

1/2 cup almond meal
1/2 cup chick pea flour
1/2 cup brown sugar, firmly packed in (I prefer less sugar, but you can increase the quantity to 3/4 cup if you prefer)
1/4 pure cacao powder
3 heaped teaspoons of egg replacer powder
1/2 cup (10 whole) of chopped walnuts
1/4 cup oil
1/2 cup almond milk
1 teaspoon baking soda
1/2 teaspoon baking powder
1 teaspoon vanilla extract
1 teaspoon of ground coffee

Method

Preheat a fan forced oven to 175 C. In a large mixing bowl add all the dry ingredients (except the chopped walnuts) and mix well with a spatula, taking care to break up any lumps in the almond meal or brown sugar. Add the chopped walnuts. I prefer to use walnuts in their shells, which I de-shell myself as I think the nuts are fresher this way as the skin does not go rancid and eliminates the step of roasting the nuts. Mix to combine.  In a smaller bowl, mix together the wet ingredients and then add to the dry ingredients to form a thick batter. Take care not to over mix. Pour into a lined baking tray/ brownie tin. I use aluminium foil to line as it is easier to press into the corners and it also allows me to take the brownies out easily while still warm.

Place in the oven and cook for 20 minutes. Turn off the oven and allow to cool in the oven for 10 minutes, and then take them out.  Set aside for 10 more minutes and then cut into squares while the brownies are still warm. Enjoy them warm or cold with a simple dusting of icing sugar. The brownies keep well for 3-4 days, if your friends and family do not polish them off sooner.


Wednesday, 17 April 2013

Gluten free flat bread with fenugreek


This flat bread is inspired by the Thepla, which is a flavoured flat bread in Gujarati cuisine. It is traditionally made with bajra (millet flour) and methi (fenugreek leaves) and the dough is brought together with yoghurt and milk. My version is dairy free and to make it you will need the following:

1 cup of millet flour (bajra/bajri)
1/2 cup of chopped methi (fenugreek either fresh or frozen)
1/2 cup of warm water
1 tablespoon of sugar
2 tablespoons of oil
1 clove of garlic finely chopped
2 spring onions finely chopped
1/2 teaspoon of salt
1 green chilli finely chopped

I have used fresh methi from my garden but you can also use frozen methi (you will need to reduce the quantity of water used). Pick the methi leaves and finely chop them along with the spring onion, chilli and garlic.

In a mixing bowl add the millet flour and salt and mix. Add the methi and other chopped ingredients. Mix the sugar in half a cup of warm water and use it to bring together the dough adding the water gradually until you get he right cinsistency. You might think it a bit odd to add sugar to a savoury bread, but it is definitely required (especially as we are not using yoghurt) as both the fenugreek leaves and millet flour have bitter undertones and the sugar helps balance it. Knead the dough briefly and shape into small balls.  Roll out each dough ball into a circular shape on a flat surface with a rolling pin. You can dust the rolling surface with the millet flour to stop the bread from sticking. Cook on a hot tava or fry pan adding a little oil while cooking each side.

Enjoy warm with dal or dry curry or on its own with a pickle or chutney of your choice.

Allergen free vegan brownies


I have tried to avoid all of the common allergens from these brownies. This recipe has been made with millet meal (which is a gluten free grain flour that has a slightly bitter undertone) but chick pea flour or brown or white rice flour works equally well. I make a small batch for myself as otherwise I end up eating it all - the ingredients below will make 8 medium sized brownie squares which will easily keep for 2-3 days in an air tight container.

You will need the following:

1/2 cup of gluten free flour (millet/ rice/chick pea flour or shop bought gluten free all purpose flour)
1/2 cup of soft brown sugar
1/4 of pure cacao powder
2 heaped teaspoons of egg replacer powder
1/4 rice bran oil
1/4 cup rice milk
1/2 teaspoon of baking powder
1/2 teaspoon of baking soda
1/2 teaspoon of vanilla extract

Method

Mix all the dry ingredients in a bowl (including the egg replacer powder). In another large bowl mix the oil, rice milk and vanilla extract and then gradually add the dry ingredients. Mix well and transfer into a small baking tray/ foil container. I often use a lined loaf tin -  this allows the brownies to rise a bit but they do sink when cool.

Place in a pre heated oven (175C) for 18-20 minutes. Cool in the oven for about 10 minutes and cut into squares while still warm. Dust with icing sugar or cacao powder and enjoy with a cup of coffee or as a desert with berries and vegan custard or chocolate sauce.


Saturday, 13 April 2013

Quick and easy minestrone soup


As soon as there is a nip in the air, I start making soups for our evening meal at least 1-2 times per week. This version of the minestrone soup is one of my favourites as it is really quick and simple to prepare and is also healthy and delicious.

To serve 4, you will need the following:

1 litre of stock (I have used a good quality shop bought vegetable stock with no preservatives or additives, but you can make your own or use chicken stock if you prefer)
1 bottle (720 ml) of passata (Italian tomato puree, which is a bit runny, you can choose to use can tomatoes, or fresh, but will need to increase the cooking time)
1 cup of rice pasta
1 can of beans/ chick peas
assortment of vegetable ( about 2 cups)
3 cloves of garlic
Small bunch of basil and chives
Salt and pepper to taste
1 tablespoon of olive oil

Method

This is more of an assembly job than cooking, and that is why it is so quick to make. I start with 1 tablespoon of oilve oil in a large saucepan, to which I add the finely chopped or minced garlic cloves. Fry for 30 seconds and add the vegetables (I used 2 carrots, 1 green and 1 yellow capsicum). Fry the vegetables in the oil for 2 minutes and then add the stock and passata. Bring the mixture to the boil and add the pasta. Once the pasta is nearly done, add the can of drained and rinsed beans of your choice. I used chick peas. Simmer, until the pasta is cooked. Season with salt and pepper and add the fresh herbs.

Ladle into large bowls, sprinkle over some more herbs and drizzle with olive oil and enjoy a hearty meal.

Monday, 8 April 2013

Chana ki dal


Dal chawal (lentils and rice) are the corner stone of Indian cuisine, and for me they are not only comfort food but a life saver as in my house they do double duty as both baby and adult food.

Ingredients (serves 4-5)
(For the dal)
2 cups of channa dal (washed and soaked for at least 30 minutes)
1onion
4 large cloves of garlic
1 inch pice of ginger
8 cups of water
1/2 teaspoon of salt
1/2 teaspoon of turmeric

(For the tarka)
1 onion
1 teaspoon of garam masala powder
Salt and chilli powder to taste
2 tablespoons of oil

Chopped corriander for garnish

Method

In a large saucepan or pressure cooker (if you have one) add the channa dal, along with the chopped onion, ginger, garlic, salt and turmeric powder with the water. Cook on a high heat, until the pressure cooker reaches full pressure of the contents of the saucepan come to a boil. reduce the heat and continue cooking for a further 3 whistles or until the dal is cooked through.

At this point, I set aside some dal for my little one, and blend it with some plain rice for a nutritious protein packed meal. 


For the adult version, I prepare the tarka by heating some oil in a fry pan and adding a chopped onion. Fry the onion on high heat, stirring occasionally to stop it from burning. The idea is to fry and brown the onion. Once the onion is golden brown, add the salt, chilli powder and garam masala. Turn off the heat and add the tarka to the cooked lentils. Add chopped coriander and serve hot with rice or flat bread and a simple salad of chopped onion, cucumber and tomato seasoned with salt and lime juice.

Tacos with lamb and kidney beans


I buy the normal super market variety of Tacos, making sure that no nasties or allergens have been added. In fact, the ones I buy do not even have salt added to them -  just corn flour, vegetable oil and water.

You will also need the following ingredients:

500 gms of minced lamb or lamb strips
1 cup of kidney beans (which I soaked overnight and boiled) or 1 can of kidney beans
2 medium sized onions
2 tomatoes
1 green capsicum
2 tablespoons of tomato paste
5-6 cloves of garlic
1 jalapeno
Small bunch of salad leaves
Handful of coriander springs
1 avocado
1 lime
2 tablespoons of oil
salt and chilli powder to taste
1 teaspoon each of cumin and coriander powder
a little water

Method

Finely chop the onion, jalapeno and garlic. You can also use a food processor. Add oil to a frying pan/skillet. Once the oil is warm, add the onion, ginger, garlic and jalapeno chlli, and cook until the onions turn brown. Add the lamb and cook on a high heat to seal the meat. Add the two tablespoons of tomato paste with 3-4 tablespoons of water and mix well. Add the powdered spices and continue cooking on a low heat for 5 minutes. Add the capsicum and tomato (cut in small cubes or strips, to match the type of meat used) and cooked kidney beans and cook for a further 5 minutes. If using minced lamb, you can allow to simmer on a low heat, while you prepare the other ingredients. however, if you used strips, turn the heat off as overcooking will toughen the meat. Add the fresh coriander before serving.

Heat the tacos in a 180C oven for 5 minutes. Wash and dry the salad leaves. In a bowl, mash the avocado. Season and add the juice of 1 lime.

To assemble, add some salad leaves in the bottom of each taco; fill with the lamb mixture and top with the avacado. The salad leaves add crunch and protect the tacos from getting soggy too quickly and the avocado and lime add a refreshing, creamy zing.


Wednesday, 3 April 2013

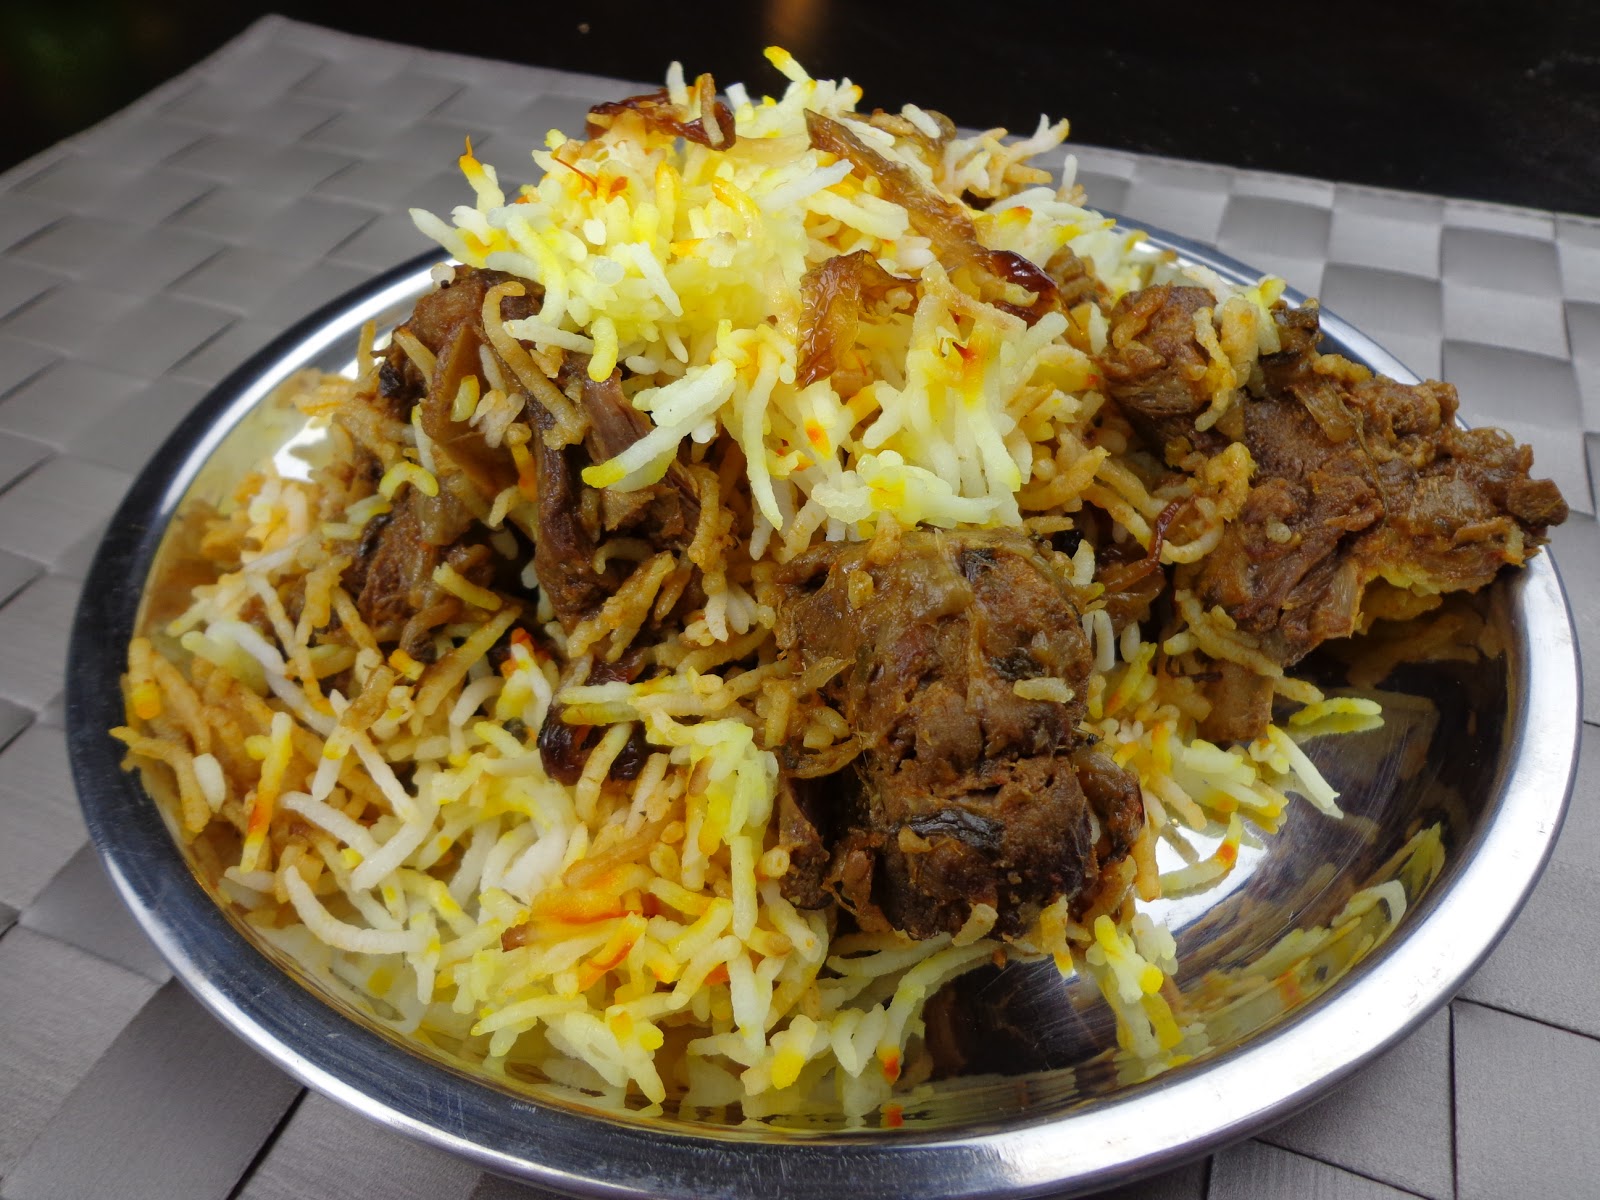
Goat Biryani (cheat's version)


I have called this biryani the cheat's version as that's what I think it is. Since I am not eating dairy I have completely skipped the step of marinating the meat in yoghurt and have also opted for cooking the meat in a pressure cooker to cut down the cooking time. Despite, the omissions/ shortcuts, the results are yummy and definitely well worth the effort.

Ingredients (to serve 6-8)

For the meat
1 kilo of goat meat on the bone cut up into small pieces
500 gms of boneless goat meat cut into cubes
4 large onions
12 cloves of garlic
Thumb size piece of ginger
2 green chillies
2 tablespoons of tomato paste
2 bay leaves
2 black cardamom
5 green cardamom (crushed)
1 finger size piece of cinnamon bark
5 cloves
5 black pepper corns
A small piece of mace
1/4 teaspoon of grated nutmeg
2 teaspoon of black cumin seeds
Salt and chilli powder to taste
1/2 teaspoon of turmeric
2 teaspoon of ground coriander and cumin powder
10 prunes
6-8 medium sized potatoes

Note: you can also choose to use shop bought biryani masala

For the rice
5 cups of good quality basmati rice
1 teaspoon of saffron
1 bay leaf
2 cloves
5 black pepper corns
1 stick of cinnamon
1 black cardamom
2 green cardamom (crushed)
1 piece of mace

For the garnish
1 onion
2 tablespoons of oil
Juice of 2 large lemons

Method:

Finely chop the ginger, garlic and chillies and slice the onions. In a pressure cooker (if using one) or large skillet/ wok, add the oil. Once the oil is slightly hot, add the whole spices and cumin seeds, allow the spices to infuse the oil -  about 30 seconds and then add the chopped ginger, garlic, chillies and sliced onions, cook until the onions are translucent. Add the meat on the bone, and seal the meat. Then add the boneless meat and cook on a high heat for a couple of minutes. (I use a combination of boneless and meat on the bone for maximum flavour and taste). Add the tomato paste, 1 cup of water and all the powdered spices and mix well. I have not added khus khus (white poppy seeds) as they are a known allergen, but if you prefer you can add two tablespoons of rinsed khus khus at this point. Add the peeled potatoes and prunes and close the pressure cooker and allow it to reach full pressure. Turn the heat down and allow it to come to pressure/ whistle a further 3-4 times. Turn off the heat but do not open the pressure cooker, allow the meat to cool in the pressure cooker while the pressure subsides.

In a large (big enough to fit the rice and meat) heavy bottomed pan, add about 5 litres of water along with the whole spices. Once the water comes to a rapid boil, add the washed and soaked rice.  Continue to cook the rice on a high heat until it is halfway done. Then drain and rinse the rise. At this point remember to set aside about 2 cups of cooked rice in a bowl to which we need to add the saffron (which has been infused in a little hot water) and mix gently.

Now we can start assembling the biryani. In the same large, heavy based pan used to cook the rice, add some oil followed by some plain rice, the meat mixture, some saffron rice and continue until all the meat and rice has been used up. About three layers of each (depending on the depth of the saucepan) is good. The last layer (topmost) should be of saffron rice. Cover with a tight fitting lid that has been encased with a tea towel. Place a tava/ diffuser or fry pan on a low heat and place the saucepan with the biryani on it, this prevents the bottom of the biryani from burning. Allow to cook for 20-30 minutes on very low heat.

Prepare the garnish by finely slicing a spanish onion and frying it until it is crisp and golden brown.
Before serving the biryani, sprinkle with the fried onions and add the lemon juice. You can also garnish with hard boiled eggs and chopped nuts if you prefer.

Serve hot, making sure you get a bit from every layer.  Savour every bite and believe me it is even better the following day.


Kebab maitabi


While I don't speak Farsi, I have been told on good authority that the word maitabi (the spelling might be a bit off) means pan, so roughly translated kebab maitabi means kebabs cooked in a pan. So to make my version, you need to start with the kebabs. I make mine with lamb mince, and I always make extra and then freeze them individually in freezer bags and stow them away for a time poor day, as they can be also be barbecued, grilled, baked in the oven or cooked in a pan with or without a sauce and can be enjoyed with rice or bread. In fact, my husband loves eating them with garlic yoghurt, combination of salad (lettuce/spinach, onion, tomatoes) and pickled gherkins if available, all wrapped up in pita bread. The salad and yoghurt can be prepared while the kebabs are cooking. So if gluten or dairy are not a problem, this might be something you may want to try.

For every 500 gms of lamb mince, you will need one onion, three cloves of garlic, salt and pepper. I also add one green chilli, but that is completely optional. Finely chop or process the onion, garlic and chilli (if using) and place in a large bowl, add salt and pepper to taste, I use about 1 teaspoon of salt and 1/2 teaspoon of freshly ground pepper. Traditionally a whole egg would also be used, but i find that the kebabs hold their shape well even without it, more so, if you refrigerate them for a bit. Add the meat and mix well/ massage with your hands. Herein lies the key to making good kebabs. Rest the mixture for 15-20 minutes and then mix again and shape into small patties. You should get about 5-6 patties/kebabs depending upon the size of the patties you make. If you are making extra freeze them in freezer bags for a later day. You won't regret it.

To start with, I seal the kebabs in a non stick fry pan. Once both sides are sealed and are slightly coloured, set them aside for later. You can use the same pan and any residual fat from the lamb to make the sauce.

To make the sauce, roughly chop one onion and 2-3 cloves of garlic. If required, add some olive oil
to the pan, allow it to heat slightly and then add the onion and garlic (though not traditional, i also add 1/2 teaspoon of grated ginger). Once the onions are translucent, add one can of chopped tomatoes and season with salt, chilli powder (to taste, keep in mind that the kebabs are already seasoned) and a pinch of turmeric. Add about 1/4 cup of water (red wine can also be used at this point, however, if you are using wine, ensure that you have cooked of the alcohol before adding the kebabs).  Mix well and then add the sealed kebabs. Cover and cook for about 5 minutes and then turn the kebabs over and cook the other side for a further 5 minutes. You can cook them a bit longer if you prefer. Once they are cooked to your liking, turn up the heat to thicken the sauce (if required) and add some chopped parsley and coriander. Serve hot, it can be enjoyed with either rice or bread.

Tuesday, 2 April 2013

Gluten & egg free chicken schnitzel


When you think of chicken schnitzel, the first thing that comes to mind is the crisp coating giving away to the soft interior. Before I commenced my elimination diet, chicken schnitzel or chicken Parma were one of our family favourites . Hence, I was really keen to find a way to make them within the parameters of my diet.

The key to the success lies in the three stage crumbling, whether you use the traditional plain flour, egg or bread crumbs or as in my case, rice flour, slurry made out of egg replacer powder (I even added a pinch of turmeric to resemble the egg wash) and corn crumbs. You can also use rice crumbs. In addition to the crumbling ingredients, you will need salt, pepper, oil, and chicken breasts.

I use organic, free range chicken and cut each breast into three, first I remove the tenderloin and then slice the chicken breast from the middle ( the thickest part) into two. If you leave the ends connected, you get the trademark heart shape, which is sold in the supermarkets but I cut it all the way through as I find it easier to cook. Next, I use a meat mallet to flatten the pieces out, ensuring they are the same thickness all through, which ensures that the entire piece will cook at the same time. Once all the chicken is prepared, set up the crumbling station. You need two plates and a shallow bowl big enough to fit the chicken pieces. In the first plate add rice flour. In the shallow bowl make a slurry of the egg replacer powder ( the quantity will depend on the amount of chicken you are using). I used two chicken breasts and used two heaped teaspoons of the egg replacer powder mixed with some water and a pinch of turmeric. In the last plate,  add the corn or rice crumbs and season them with salt and white pepper.

Dust the chicken breast with the rice flour, covering both sides, dunk it in the egg replacer mixture covering both sides and finally cover with the corn crumbs, ensuring the entire breast is well coved.
Follow the process with all the chicken pieces. You can choose to deep fry the schnitzels at this point, but I prefer to pan fry them in a non stick pan. I use rice bran oil as it has a high smoking point. Get the non stick pan really hot, add enough oil to over the bottom of the pan in a thin layer. Add the chicken pieces cooking each side on high heat for 1 minute and them lowering the heat. Cook for about 6-8 minutes, until the schnitzels are golden brown and the insides are cooked to your preference. I serve mine with a simple green salad and some corn cobs brushed with garlic infused oil. For my husband, I placed some chopped seasoned tomatoes and grated cheese on top of the schnitzel and place in under a hot grill, until the cheese melts.


Serve hot with your favourite condiments.

Tuesday, 26 March 2013

Gluten free, vegan chocolate cake


To make this dairy, egg and gluten free cake, you need to secure some pure cocoa powder. It can be found in health food stores. However, if there is no dairy allergy you can also use good quality cocoa powder found in the super market as it often contains skim milk along with sugar etc.

To make the cake you will need the following:

1 cup of almond meal flour
3/4 cup of chick pea flour
1/4 cup of cocoa powder
1 cup of sugar
1 teaspoon of vanilla extract
3 level teaspoons of egg replacer powder
2 teaspoons of baking powder
1 teaspoon of baking soda
 4 tablespoons of vegetable oil 
1 cup of almond milk
Raspberries and icing sugar to decorate

Mix together all the dry ingredients well in a mixing bowl with a spatula. I generally do not like my cakes very sweet, and one cup of sugar is perfect for me. But if you prefer your cakes sweeter, especially if you are using pure, unsweetened cocoa, you can add an extra 1/4 cup of sugar. Mix all the wet ingredients in a separate bowl and add to the dry ingredients. Stir to mix but be careful not to over mix.

Place the mixture in a lined 20 cm cake tin, sit it on a baking tray and place it in a preheated fan forced oven (180 C) for  40 minutes, or until a skewer inserted in the centre comes out clean. Cool the cake before taking it out of the tin. Place fresh raspberries and dust with icing sugar.

To make a chocolate sauce to accompany mix together two tablespoons of cocoa powder with 2 tablespoons of icing sugar and 1-2 tablespoons of apple juice and a few drops of oil. Add the juice slowly until you get the desired consistency. You can also use a thicker version of the sauce to ice the cake.

Gluten free, vegan almond cake


I made this cake over the weekend as my husband and I were entertaining a vegan acquaintance who is also allergic to wheat.  Given that I have been doing plenty of allergen free cooking, I was not perturbed with the prospect of entertaining someone with dietary restrictions. However, this cake was more of an experiment than general as I had run out of the egg replacer powder ( I used the last of it for my vegan custard) and thus ended up using vinegar and soda water instead, an old method which I have used in the past to make eggless cakes, and the results speak for themselves.

Ingredients
1 cup chick pea flour
1 cup almond meal
1 cup caster sugar
2 teaspoons of baking powder
1 teaspoon of baking soda
1 teaspoon of apple cider vinegar
1 cup of soda water
4 tablespoons of oil
1 teaspoon of vanilla extract

Method
Line the base and sides of a 20 cm round baking tin and place on a baking tray. Pre heat fan forced oven to 180 degree Celsius .

In a mixing bowl mix together all the dry ingredients. Add the wet ingredients, stir to incorporate and place in the cake tin. Bake for 40 minutes. Allow the cake to cool in the oven for a further 10 minutes.  Remove from the oven and allow to cool in the tin for a further 20 minutes before removing the cake.

I prefer to decorate my cakes with fruit, rather than ice them and in this instance have used in season plums. I also served it with a vegan custard which I made with almond milk, sugar, egg replacer powder, vanilla and a pinch of saffron.


Gluten free, vegan almond meal cookies


Ingredients
1/4 cup chick pea flour
1/4 cup almond meal
1/4 cup sugar
1/2 teaspoon baking soda
1/2 teaspoon baking powder
1 heaped teaspoon of egg replacer powder
2 tablespoons of  vegetable oil ( I have used rice bran oil)
1 tablespoon of almond milk
Few drops of vanilla extract

Mix all the dry ingredients well with a spatula in a mixing bowl. Add the oil, vanilla and almond milk and bring together into a soft dough. Place little balls of the dough onto a lined baking tray and bake in a preheated oven ( 175 degree Celsius) fan forced oven for 18-20 minutes. Allow to cool, before removing them from the tray.

If you can avoid the temptation, these cookies will keep in an air tight container for 4-5 days.

Gluten free, vegan almond and orange cake


1 cup almond meal
1 cup besan / chickpea flour
Zest and juice of two oranges
3 teaspoons egg replacer powder
2 teaspoons gluten free baking powder
1 teaspoon baking soda
4 tablespoons olive oil 
1/4 cup of flaked almonds to sprinkle on top
Icing sugar to dust


Method 
Preheat fan forced oven to 180c.
Line the base and sides of a 20 cm springform tin with baking paper ensuring the baking paper on the sides comes above the tin - this will protect the cake and flaked almonds from browning too much.
In a large mixing bowl, mix together all the dry ingredients. Add the orange zest, juice and oil and mix again with a spatula. Pour mixture into a lined 20 cm round baking tin. Sprinkle the top with flaked almonds and place in the preheated oven. Bake for 45 minutes. May take longer in a conventional oven. Allow to cool in the tin for 10 minutes. Once cool enough to handle, take the cake out of the tin, remove the baking paper and place on a cake stand or serving plate. Dust with icing sugar and enjoy a slice of this scrumptious cake warm with a cup of coffee or tea. Should keep in an air tight container for 3-4 days, however, I am lucky if it lasts 2 days in my house as my husband and I are quick to polish it off.